


Travertine hole: should they be repaired?
- Jul 20, 2018
- 3 min read

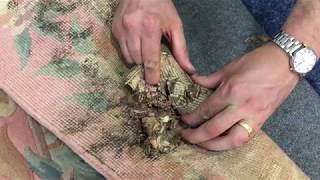
A Travertine tile floor is naturally porous and it has got many holes on the surface.
These holes where formed in the forming of the stone when water containing minerals ran through underground caves thus allowing sediments to settle forming travertine.
Some Travertine tiles will get filled with resin or grout at the factory or on site when the tiles gets installed. In some cases the filler is not applied and a more rustic look is achieved (though keeping these floors clean is much harder)
With time the filler can come lose and it will be required to be filled again. These holes can sometimes become more apparent after deep cleaning.
Before doing the repair, you will need to make sure the floor has been clean properly. A professional clean will likely be required.
It can be hard to match the colour of the fillers though travertine tiles usually consist of a variation of minerals and therefore a variation in colour is apparent making colour matching a little easier. You can use different types of filler.
How to fill holes in your travertine floor
Step 1 - Grout
To start you need to find a colored epoxy grout that matches the color of your travertine tile floor. Ideally, you should take a small piece of tile along when choosing your grout colour
If that’s not possible, plastic swatches of grout color is also an easy alternitive, Be aware that the color you see on the swatch can be a shade darker or lighter than the grout will be on the travertine tile floor.
Step 2 - Cleaning
Before you apply the grout, thoroughly clean out the hole. Do this with soapy water, then dry it with paper towels. For a more through clean use Wax and Residue Remover followed by a through rinse with clean water - repeat if necessary. Make sure you extract all the debris from the hole. Allow it to dry completely before filling.
Step 3 - Sealer
Use stone sealer on the travertine tile floors around the hole you need to fill. A great product is Staingaurd SB You’ll find that doing this will make it a great deal easier to clean up the grout later, once the hole is filled. Apply 2 - 4 thin coats and wipe dry shortly after - There should be no liquid on the surface Give the sealer a full hour to dry.
Step 4 - Filling
The important part is filling the hole properly. It needs to be well packed with the grout. Begin by mixing up the epoxy grout according to the instructions on the packet. Place the grout on the hole and use the gout float to begin packing it into place. Watch out as air pockets can form in the hole - Use a rubber glove and then you can use your finger to force it in.
Keep going until the hole has been filled. Be sure to pack the grout down firmly into the hole so it can bond fully. If you don’t, then the chances of the grout working its way out of the hole again are quite strong. Use a damp sponge to wipe the excess grout from the travertine tile floor. This where you’ll appreciate having put on the sealer first, as the excess grout will wipe up very easily. Don’t have to sponge too wet, and don’t wash the grout from the hole.
Step 5 - Cleanup
Give the grout a full 12 hours to dry before cleaning up. You might find that there’s a grout haze. If that happens, wipe the travertine tile floor with a dry paper towel to remove the haze from the stone. As long as you’ve put the grout in properly and wipe off the excess you should have a smooth finish on the stone. If there are other holes in the travertine tile floor, they can be repaired using the same method.
It is strongly advise to test the process above in a inconspicuousness area first to identify adverse reactions.
No guarantees are made this process will be successful and you carry the work out at your own risk - For expert advice call Art of Clean on 01223 863632

Comments